Blogger Widgets

Thursday, March 29, 2012

EASY Shepherd's Pie


This was the first time I have made this dish, it was a request from my husband who's grandmother had made it when he was younger. So I did a little research and found a few recipes and went with my own version/tasteChris remembers his grandmother's little different than my version or the versions I had seen online...she probably just made her own version and made more layers. :) In my search I found a lot of different versions. Some called for Worcestershire sauce and I'm going to try that next time. 

Shepherd's Pie was a dish made with Lamb or Mutton. BTW if you don't know what Mutton is, its a older Sheep (don't feel bad, I had to look it up lol) The origin was that shepherds were concerned with Sheep, not Cattle. American's usually use Beef and that version of the dish, is called "Cottage Pie" But I'll just call it Shepherd's Pie since most people know what that is... For those of you who don't, its a Meat Pie covered in a crust of Mashed Potatoes. And as I found out, So Very! Good!! and easy, and we like easy ;)


Here is what you need:
Depending on the size of casserole dish you use...
I used a 8 x 11.5 baking dish (to small!!)
Approximately 2 Lbs. of Ground Beef
1/2 Cup each of either fresh, frozen or canned Veggies that you prefer. I used frozen corn and canned peas and carrots that I froze the extra from a earlier recipe. 
4-5 Large Potatoes or Instant Potatoes. I used Instant because this is a easy version :) And I didn't have any Idaho Potatoes. You can use any potatoes that you prefer.
Jar or can of Gravy
1/2 cup of Sour Cream
1/8 Teaspoon of Onion Powder (or fresh 1/2 Cup chopped,and cooked with the beef)...My Hubby doesn't like Onions :)

Corn, Gravy, Sour Cream, Peas, Carrots
Mozzarella-Mild Cheddar mix


Use Fresh

Or use Instant
         
 
              Or use


Preheat oven to 400 degree's.

Cook the ground beef and drain.

In a bowl combine cooked Meat, Gravy, Sour Cream...fold in the veggies,until mixed well.


Spread the  Meat mixture in Casserole Dish


Add a layer of Cheese, then a layer of Potatoes


Put on middle rack in oven for about 30 min. until golden, hot and bubbly.
Next time I'm going to use a bigger, deeper pan because mine bubbled over :/


**Also a word of caution if you would like yours browned more on top, don't put a glass dish under the broiler! it will crack!! 
I'm going to use my 13x9 metal cake pan next time so I can brown mine more and so it won't bubble over.... hopefully ;)


YUM!


Tuesday, March 20, 2012

Blueberry Cheese Danish


(Blueberry, Peach, Raspberry && Cherry, Apple Cheese Danish)
I saw this recipe and borrowed it from Lauren at Lauren's Latest
couldn't wait to try it, it looked so mouth watering and really easy to  make! 
I've been so busy with the weather being so nice and the yard work needing done, but I finally got to make it this morning. Then our internet went down :(
It was easy to make! I never thought I would make something like this because it seemed difficult, or took to long (I'm impatient when it comes to things like that) but her recipe was easy!!  It was just as good, as store bought! Chris (My Hubby) says its even better cause its was fresh AND homemade! :) 
It was Awesome! you notice I said was, its almost gone... 


Here is what you need:

1 Tube Pillsbury Crescent Rolls
8 ounces Cream Cheese, softened
1/2 Cup Granulated Sugar
1 Teaspoon Vanilla Extract
3 Tablespoons All Purpose Flour
1 Cup Blueberries

For the Icing
1/2 Cup Powdered Sugar
2 tablespoons Whipping Cream
1/8 teaspoon Vanilla Extract


Preheat oven to 375 degrees... 
In a  bowl, combine cream cheese, sugar, flour and vanilla.

Put it to the side.

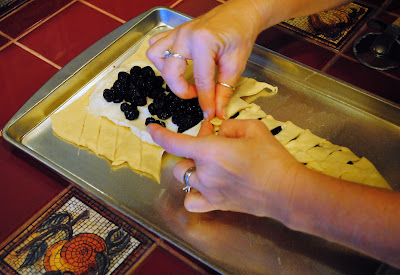
Open crescent roll dough and unroll, leaving them in rectangles. On an ungreased baking sheet, lay the crescent roll rectangles together, lining them up sideways. (See Picture below )

Dough should be almost the entire length of a half sheet pan. Press the edges together and seal any holes.

Spread cream cheese filling down the center of the dough, about 2-3 inches wide. 


 Add your Blueberries (or any fruit you desire)  
Cut 1/2 inch diagonal strips up each side of the dough.(I used a pizza cutter)

Fold 1/2 inch dough pieces up.  


Bake for 20-30 minutes or until filling is set and  dough is golden in color. 


Cool before removing from baking sheet. Mine took about 15-20 minutes to cool (that was the LONGEST 20 minutes!) lol
Meanwhile...
Make Icing
In a small bowl, mix together powdered sugar, vanilla to a nice consistency. You may need to add more whipping cream to get consistency you like. 

Once danish has cooled, remove to serving platter. 
Drizzle Icing over danish. 

Finished Danish...Doesn't it look good enough to eat the whole thing? lol


I used frozen Blueberries, because my grocery didn't have fresh... and I added a little sugar in them as they were defrosting, so they marinaded in sugar water until I was ready to make this. Which was a lot longer than I intended... oh well
Next time I'm going to try Blackberries, but I bet it would be good with any kind of Berry, or No Berry's at all!! I also want to try Cherry Pie Filling, and then maybe I'll try..... ;)

UPDATE 4-30-2012
I made this with (drained) Canned Peaches in place of the Bluberries and it was wonderful!!! So Good!!! Going to gain so much weight lol


Peach

Peach

Peach


UPDATED AGAIN 9-22-12
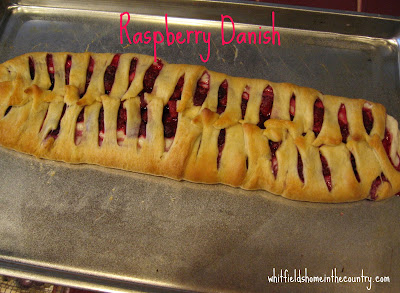
Raspberry Danish
I used frozen Raspberry's in place of the blueberries


 So good! Yum! 
I see a Cherry Danish in my very near future :) Stay tuned...

We will just have to roll us out the door pretty soon if we keep eating these!!

Update 9-30-12
Cherry Cheese Danish
Really, I think any fruit filling would be awesome in this! Cherry Pie filling didn't let me down! Even my hubby enjoyed it and he's not a fan of Cherry Pie...


Cherry

Cherry Cheese

Cherry Cheese
UPDATE 10-28-12
Apple Pie Filling,Cheese Danish
Think I will add a little extra Cinnamon on top of the apple filling :)
It was yum though! 


Apple Cheese

Apple Cheese

I have to say, these make good "thank you" gifts! They are quick, easy, and homemade! I've been making them a lot lately for friends and neighbors, for "thank you's" to show our gratitude.
Who doesn't like Homemade Desserts?  


Monday, March 19, 2012

Homemade ♥ Hummingbird Nectar


I think one of my favorite Birds are Hummingbirds! I love their jewel like colors that glow like prisms in the sun. Love watching them zoom in and out... blink and you'll miss em'
I can not Wait to see who comes to visit my feeder at my new house!!


Velvet-Purple Coronet Hummingbird by Tom Munson

Just a few hummingbird facts for you...

~* Hummers are the only birds that can fly backwards.
~* They got their name from the sound their wings make when they fly.
~* They can fly at speeds exceeding 34 mph!
~* The smallest Hummer is the Bee hummingbird measuring  5 cm.
~* Hummingbird nests are approximately the size of a quarter.
~* In some species, their heart rate can reach as high as 1,260 beats per minute.
~* While in flight have the highest metabolism of all animals.
~* They also consume more than their own weight in nectar each day, so they must visit hundreds of flowers daily. Because of this they  are..
~* Continuously hours away from starving to death, and are able to store just enough energy to survive overnight.

Sooo this is why we need to help feed them :)

Here is what you need:
1 Cup of Sugar
4 Cups of Water
Hummingbird Feeder
** Do not use Red (or any) food coloring as it causes a fungus to grow on their tongues!! 
If you have red on your feeder that will be enough to attract them, I always have some flowers like Fuchsia's, or Petunia's near by to help attract them. I've seen them drink the nectar from my Hosta's and they like pretty much any flower that is shaped like a Trumpet!
Petunia by Swallowtail Garden Seeds
Fuchsia by Glacial Ridge Growers


Bring sugar water to a boil, let cool completely before pouring into feeder. I use 1 cup at a time and freeze the rest and use as needed. In the summer I change it out often as it tends to get moldy quick if they don't drink it all first! 
Depending on how many hummers come to my feeder, I may have to use more than a cup at a time at my new house.... hopefully ;)


Costa's Hummingbird by Dean M. Chriss Photography


There are lots of different kinds of hummingbird feeders, but there are a couple of my favorites  (and the hummingbirds too) I knew they liked mine because my old neighbor had one like the one pictured below, and they always came to mine first :D She also used the store bought nectar, so maybe that had something to do with it? Don't know, but I know it made her mad that they came to mine but not hers ;) hehehe 


I got the one pictured below from Wild Birds Unlimited a long time ago (but it broke) and I forgot it had a lifetime warranty :( and threw it away. They LOVED this feeder!! Mine had a moat you could fill with water so the ants wouldn't invade. Maybe they don't make them like that anymore?

WBU Small Hummingbird Feeder
Another feeder they seem to love, and that I'm currently using, is this one...
Hummers Galore Hummingbird Feeder


This link goes to Ebay, but I'm happy they carry this feeder at my local Feed-N-Seed :)  You might be able to find them on Amazon? 
They are actually called Hummer's Galore and Bacon Products Corporation in Tennessee makes them. I checked the website and it doesn't have a link to see where to buy them, but I bet you could email or call them and they could tell you, if you really, really wanted to purchase one :)

Not only do Hummingbirds like the sugar water but also it tends to attract Bee's and Ants which we don't want! So I use a little Avon's Skin So Soft applied with a Q-Tip just around each hole, not to close where the Hummers can get it but close enough to deter the Bees and Ants. I also put it on the top and on the little metal hanger because that's where the Ants come from. If it rains I have to re-apply the Skin So Soft. 
Also Baltimore Orioles like sugar water, and I have heard that some Bats! like it too!! Orioles are okay, but I don't know about the bats!!!

Sooo there you have it.... 
go now, and make some juice for your little hummer friends, you will enjoy watching their antics as they try to keep each other away from the feeder! 

My Hummer Feeder Hanging on the Porch


Got my Husband ♥ to hang mine on the porch :)


And Let me know how yours does!


EDIT: 7-21-2012
My sister sent me a link with Hummingbird info and I found a very cool video on how Hummingbirds eat, check it out!

http://www.wired.com/wiredscience/2011/05/hummingbird-tongue-drinking/


Saturday, March 17, 2012

Keeping Soil In Your Flower Pots


Its a beautiful day to plant Flowers!!!

I saw this idea on Pinterest and needed to plant some Pansies anyways ( Pansies are One of my favorit-est flowers ever!! Especially Purple! ones )  so I thought I'd try it out!  Its simple, & why didn't I think of that!? 

I hate when you plant new plants, in pots and water them the first couple of times and all the soil comes out the bottom :/  don't you hate that?
I took this idea one step further though... I added Two! coffee filters lol :)

I started  by scrubbing my pot to get all the green stuff growing on it, off.


All clean! :)
Add your coffee filter...


Coffee filter #1
Add drainage rocks...


Drainage rocks

Add another coffee filter...
I know, I know, it looks like the first coffee filter, its not trust me ;)


Second coffee filter #2, on top of rocks
My reasoning for adding the second filter is... I feel the soil will clog up the rocks and it won't drain as well...sounds good huh? I'll let you know how it all works out.

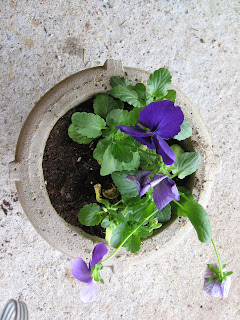
Add your soil and plants...                        


 Water them well


That's it! All done.


I LOVE Spring!!! Happy Planting :D


Pin It


Total Pageviews

Related Posts Plugin for WordPress, Blogger...