Blogger Widgets
Showing posts with label Food Coloring. Show all posts

Thursday, February 7, 2013

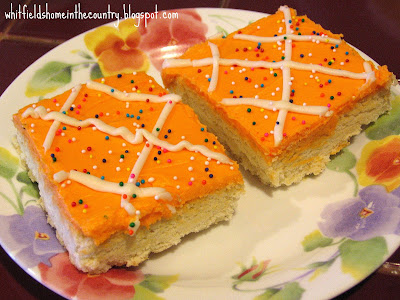
Sugar Cookie Squares


Just in time for Valentines Day....
If you have a sweetie, that loves sweets, then make these Sugar Cookie Squares for them (Or for yourself)   They are much simpler than cut outs, and you don't have to frost them individually! How simple is that?
These cookies are like the ones you see in the store, you know the ones, there are about 8 round, colorful, frosted and sprinkled cookies in the little clear plastic container....and they cost about 4 bucks!  So, If you like those cookies, you will LOVE these!!  I found the recipe on Pinterest (of coarse) and you can find the link to the original site here

These are thick, soft and moist and will definitely satisfy any sweet tooth you may have..

I made a couple batches at Christmas and gave them out as gifts, needless to say, they were a hit!
I'll have pictures of those at the end of this post. 
So these cookie squares aren't just for holidays, they are perfect for any occasion, classroom treats or bake sales, baby showers, parties etc...


Here is what you need:

1/2 cup Butter, softened
1 cup Granulated Sugar
1 Egg
1 Egg white
1  Tbsp Sour Cream 
1 tsp Vanilla 
2 1/2 Cups All-Purpose Flour
1/2 tsp Baking Powder
1/2 tsp Salt


Preheat oven to 375 degrees. Butter a 13" x 9" pan, set it aside.
In a  bowl combine flour, baking powder and salt, set it aside. 


In the bowl, whip together with a mixer, butter and sugar until fluffy about 3-4 minutes. 


Stir in egg and egg white. Add sour cream and vanilla and mix until blended. 


Slowly add dry mixture and stir until well combine. 


With buttered hands, gently pat mixture into buttered 13x9 pan. 


Bake 17 - 20 minutes until toothpick inserted into the center comes out clean and edges are lightly golden.
Cool completely,
Frost. (Vanilla Frosting Following)


Vanilla Frosting:


Here is what you need:


1/4 cup Unsalted Butter, softened
2 Cups Powdered Sugar
2-3 Tbsp Half and Half
1/2 tsp Vanilla
Pinch of Salt
Sprinkles
desired amount Food Coloring 


In a  bowl, using an electric mixer, whip together butter and powdered sugar and half and half until fluffy. 


Stir in vanilla and salt. 


Once its well mixed, At this point, I spooned out about 2 Tablespoons of the white frosting and put it in a sandwich baggie (I don't have a frosting bag) to pipe the lines on.


Add desired amount of food coloring and mix until well blended. (I used about a 1/4 inch line of the gel food coloring)


I think these are to cute to eat!!   Just kidding   Yum!
Enjoy your cookies...

Here are the ones I made for Christmas ( I know they aren't really Christmas colors, but what can I say.)


I just have to take a minute and brag on my husband... 
I needed a mixer, and things were tight at Christmas, so he bought me a cheap hand mixer from the dollar store to use. Well, the mixer kept falling over, and would not stand up!! Especially if there was something on the beaters Grrrr!
So, I complained  
¯\(°_o)/¯ Lol ...so he made me a stand out of pvc to hold my mixer. Thank You Honey!


He is so good!! 

♥║║
╚══╝


Monday, October 15, 2012

Making a Paper Peony (Tutorial)


These are so pretty! I came across Michella Marie's tutorial and I had to try it!!  I couldn't wait to run out and get the wire and floral tape! Everything else, I had on hand. :) 
They were fun to make and it was quick and easy with a satisfying end result!!
I dyed the first ones pink, with the pink neon gel food coloring. I really didn't care for those, they didn't look very realistic to me, but I used those pictures in the tutorial anyways.

Since purple is my favorite color, I think I'll do a few in purple just to see if they turn out.  ¯\(°_o)/¯  If they look good I'll post a few pictures...

Also next time I'm going to cut the "petals" a little different (wavy) to see how that looks. :)

Each flower took about 10-15 minutes to make, total!
I think the longest part was waiting for the pink ones to dry!


What you need:

Coffee Filters (I used 6 filters for each flower, 3 small ones that I cut, and 3 normal size) you can use more filters if you want a fuller flower :)
Floral Wire (I used 18 inch 18 gage)
Floral Tape
Glue (I used hot glue,but you can use any kind)
Scissors
Needle Nose Pliers
Food Color (optional)

 I used the 3 1/4 inch filters (6-12 cup size) for all of my petals, and cut  a 1/2 inch off  3 of them to make the "smaller" size. My end flower size was about as big as my hand, stretched out...give or take a little. You can use the larger paper filters (5 1/4 inch) but this is just what I had on hand, and what I use in my coffee maker.


For the 3, inner smaller filters, this is when I cut them down to the "smaller" size.


be careful not to cut yourself on this step!


Making the Flower...
Start out by cutting your wire to length, I cut mine to 6 inches, then using  your needle nose pliers, curl one end of wire.


Poke a hole in the center of your 1st filter.


Slide the wire down to the loop.


 add a drop of glue.


Pinch and twist the base.


Add a drop of glue at the base (not shown) and continue adding your small filters.


When you have added all the small filters, wrap the base with some floral tape, before you start on the larger filters.


You don't have to wrap the whole wire at this time, just the base, for now


Add another drop of glue (not shown) and begin with the larger filters and repeat with the drop of glue between each filter, until you have added them all. After adding your last filter, using the floral tape, wrap the base, and continue down the whole wire.


All done :)

Make some more...


All White

White with random pink spots

Add pink spots

White with pink center with dark pink spots
Love These!!


This was fun, Thanks Michella! Cant wait to make more....
Let me know how yours turn out!


Total Pageviews

Related Posts Plugin for WordPress, Blogger...