Blogger Widgets
Showing posts with label Flour. Show all posts

Thursday, February 7, 2013

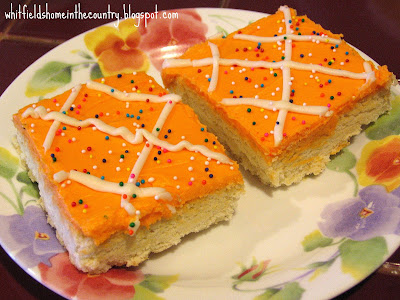
Sugar Cookie Squares


Just in time for Valentines Day....
If you have a sweetie, that loves sweets, then make these Sugar Cookie Squares for them (Or for yourself)   They are much simpler than cut outs, and you don't have to frost them individually! How simple is that?
These cookies are like the ones you see in the store, you know the ones, there are about 8 round, colorful, frosted and sprinkled cookies in the little clear plastic container....and they cost about 4 bucks!  So, If you like those cookies, you will LOVE these!!  I found the recipe on Pinterest (of coarse) and you can find the link to the original site here

These are thick, soft and moist and will definitely satisfy any sweet tooth you may have..

I made a couple batches at Christmas and gave them out as gifts, needless to say, they were a hit!
I'll have pictures of those at the end of this post. 
So these cookie squares aren't just for holidays, they are perfect for any occasion, classroom treats or bake sales, baby showers, parties etc...


Here is what you need:

1/2 cup Butter, softened
1 cup Granulated Sugar
1 Egg
1 Egg white
1  Tbsp Sour Cream 
1 tsp Vanilla 
2 1/2 Cups All-Purpose Flour
1/2 tsp Baking Powder
1/2 tsp Salt


Preheat oven to 375 degrees. Butter a 13" x 9" pan, set it aside.
In a  bowl combine flour, baking powder and salt, set it aside. 


In the bowl, whip together with a mixer, butter and sugar until fluffy about 3-4 minutes. 


Stir in egg and egg white. Add sour cream and vanilla and mix until blended. 


Slowly add dry mixture and stir until well combine. 


With buttered hands, gently pat mixture into buttered 13x9 pan. 


Bake 17 - 20 minutes until toothpick inserted into the center comes out clean and edges are lightly golden.
Cool completely,
Frost. (Vanilla Frosting Following)


Vanilla Frosting:


Here is what you need:


1/4 cup Unsalted Butter, softened
2 Cups Powdered Sugar
2-3 Tbsp Half and Half
1/2 tsp Vanilla
Pinch of Salt
Sprinkles
desired amount Food Coloring 


In a  bowl, using an electric mixer, whip together butter and powdered sugar and half and half until fluffy. 


Stir in vanilla and salt. 


Once its well mixed, At this point, I spooned out about 2 Tablespoons of the white frosting and put it in a sandwich baggie (I don't have a frosting bag) to pipe the lines on.


Add desired amount of food coloring and mix until well blended. (I used about a 1/4 inch line of the gel food coloring)


I think these are to cute to eat!!   Just kidding   Yum!
Enjoy your cookies...

Here are the ones I made for Christmas ( I know they aren't really Christmas colors, but what can I say.)


I just have to take a minute and brag on my husband... 
I needed a mixer, and things were tight at Christmas, so he bought me a cheap hand mixer from the dollar store to use. Well, the mixer kept falling over, and would not stand up!! Especially if there was something on the beaters Grrrr!
So, I complained  
¯\(°_o)/¯ Lol ...so he made me a stand out of pvc to hold my mixer. Thank You Honey!


He is so good!! 

♥║║
╚══╝


Saturday, October 20, 2012

Single Serving Chocolate Chip Cookie in a Mug


Do you ever get a sweet tooth late in the evening and there NEVER seems to be anything that  satisfy's it?  Or its way to late to go out?!  Well I have something....I had a request awhile ago in My Survey to do a Mug Cake, and I was looking around for a good recipe and found this recipe from Melissa at no.2 pencil... I know its not a cake, but...
I will still do a mug cake but I had to do this first :) this is a single serving cookie made in a custard cup. (or  a coffee mug, or a ramekin) Its fresh and it can be made in a matter of minutes! Don't ya just love that!!??
I saw a bunch of recipes floating around on Pinterest but I wanted to give something different a  try.... and this was it!

This has the potential to be really bad... because its THAT good!  I'd better not keep all the ingredients in the house, or they will have to roll me out the door come spring time  (-’_'-)

Mine took all of 60 seconds to cook, the bottom layer reminded me of  Subway's Chocolate Chip Cookies....yum!
Set your microwave for 40 seconds and go from there, I checked every 10 seconds after that.


This is what you need


1 Tablespoon Butter
1 Tablespoon Granulated White Sugar
1 Tablespoon of firmly packed Dark Brown Sugar
3 Drops of Vanilla Extract (this is really hard! be careful)
Small Pinch of Kosher Salt (or regular table salt)
1 Egg Yolk (I gave my egg white to the dogs, they ♥ me)  ツ  
Just under 1/4 Cup of All Purpose Flour
1/8 Cup Tablespoons of Semi Sweet Chocolate Chips (I used mini's)


Melt tablespoon of butter in microwave (not shown)
Stir in  Sugar, Brown Sugar, Vanilla,and Salt.
Stir... Add Egg yolk, stir


Add  Flour


 and Stir some more... 


Add the Chocolate Chips...


Stir...

Transfer it to the cup your cooking it in. (I wasn't sure it would fit in the custard cup or I would have mixed it in there.)
Put it in your microwave for 40 seconds and check for doneness every 10 seconds after that.


60 Seconds, Ding..all done! Let it cool a minute if you can  ¯\(°_o)/¯


A picture is worth a thousand words...had to put the dreamy softness effect around it hehehe 


MMMMmmmm warm and gooey


Nom, nom, nom


What are you waiting for?  Only takes a few min....


Sunday, May 20, 2012

(Tender) Beef Bottom Round Steak


Tender Baked Bottom Round Steak(s) ~ picture added 8-29-13

Recently my grocery store had Bottom Round Steaks on sale, Buy One Get One... I always used to cook these on the grill and they were a little on the tough side but they always tasted good! The last time my husband came shopping with me and I was looking at these, and he said "these are NOT steaks, get a Rib Eye, or a T-bone or something, those are steaks!  ¯\(°_o)/¯    So... I didn't get any steaks for a couple weeks.(•̪●)  Eventually I did break down and bought a couple Rib Eye's , I just couldn't resist a juicy steak cooked on the grill.  Well last week I went ahead and bought a couple of the Bottom Rounds and thought to myself  "I'll just cook them some other way"  Hence, this blog post. I just couldn't pass up that sort of deal!
I admit, this is one of the tougher cuts of meat, but you can make it a lot more tender...
All you have to do is "fork it"  ;) 
It turned out good, and I plan on having it again. Oh and BTW my hubby liked it too! hehehe...

Here is what you need:

Bottom Round Steak or two (they do shrink considerably)
Your favorite Seasoning (I use Everglades Seasoning and Garlic Salt)
1-2 Tablespoons of Olive Oil
1/3 Cup of Flour (I added some seasoning to the flour also)
1 Cup of either Beef Bouillon or Beef Broth (I used Bouillon)
1/2 Teaspoon(or more if you like) of either fresh Garlic (minced) or Minced Garlic from a jar. 


I use Everglades Seasoning in just about everything I make!!


First get a cutting board and place your meat on the board and poke the steak with the fork for about 2 minutes on each side.(trust me your arm will get tired!) The more pokes the better, this will help make it tender. Stop poking if it starts to rip. After I forked it, I put a little seasoning on and and rubbed a little olive oil on each side and let it sit in the fridge for a little over a hour. (You don't have to do this, unless you want to do a marinade, I just did because my hubby was working late and I didn't want to start it to early )  (•̮̮̃•̃)


When I was ready to cook it, I laid it in the flour mix and coated each side.
Coat with Flour/Seasoning, both sides.
Heat  the oil in the pan on Med. High, sear it on both sides. (Don't flip to soon or it wont have a nice crust on it, or the flour mixture will come off.)
Sear Meat on both sides
Once seared put it in a baking dish with the Broth and Minced Garlic. Cover with foil and bake it at 350 degree's for about 30-40 minutes or until it pulls apart with a fork easily.
When it is done it will look something like picture below. We enjoyed ours with Mashed Potatoes and Corn. This had a nice flavor, and was tender!

Tender Baked Bottom Round Steak(s) ~ added pic 8-29-13


Tender Baked Bottom Round Steak

If you have any other ways to cook Bottom Round that makes it tender, please share with a comment and let us know!


Tuesday, March 20, 2012

Blueberry Cheese Danish


(Blueberry, Peach, Raspberry && Cherry, Apple Cheese Danish)
I saw this recipe and borrowed it from Lauren at Lauren's Latest
couldn't wait to try it, it looked so mouth watering and really easy to  make! 
I've been so busy with the weather being so nice and the yard work needing done, but I finally got to make it this morning. Then our internet went down :(
It was easy to make! I never thought I would make something like this because it seemed difficult, or took to long (I'm impatient when it comes to things like that) but her recipe was easy!!  It was just as good, as store bought! Chris (My Hubby) says its even better cause its was fresh AND homemade! :) 
It was Awesome! you notice I said was, its almost gone... 


Here is what you need:

1 Tube Pillsbury Crescent Rolls
8 ounces Cream Cheese, softened
1/2 Cup Granulated Sugar
1 Teaspoon Vanilla Extract
3 Tablespoons All Purpose Flour
1 Cup Blueberries

For the Icing
1/2 Cup Powdered Sugar
2 tablespoons Whipping Cream
1/8 teaspoon Vanilla Extract


Preheat oven to 375 degrees... 
In a  bowl, combine cream cheese, sugar, flour and vanilla.

Put it to the side.

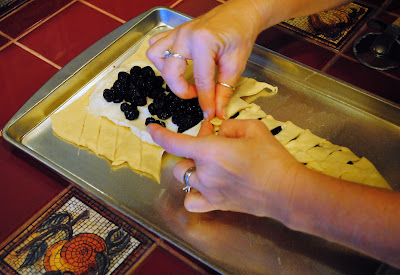
Open crescent roll dough and unroll, leaving them in rectangles. On an ungreased baking sheet, lay the crescent roll rectangles together, lining them up sideways. (See Picture below )

Dough should be almost the entire length of a half sheet pan. Press the edges together and seal any holes.

Spread cream cheese filling down the center of the dough, about 2-3 inches wide. 


 Add your Blueberries (or any fruit you desire)  
Cut 1/2 inch diagonal strips up each side of the dough.(I used a pizza cutter)

Fold 1/2 inch dough pieces up.  


Bake for 20-30 minutes or until filling is set and  dough is golden in color. 


Cool before removing from baking sheet. Mine took about 15-20 minutes to cool (that was the LONGEST 20 minutes!) lol
Meanwhile...
Make Icing
In a small bowl, mix together powdered sugar, vanilla to a nice consistency. You may need to add more whipping cream to get consistency you like. 

Once danish has cooled, remove to serving platter. 
Drizzle Icing over danish. 

Finished Danish...Doesn't it look good enough to eat the whole thing? lol


I used frozen Blueberries, because my grocery didn't have fresh... and I added a little sugar in them as they were defrosting, so they marinaded in sugar water until I was ready to make this. Which was a lot longer than I intended... oh well
Next time I'm going to try Blackberries, but I bet it would be good with any kind of Berry, or No Berry's at all!! I also want to try Cherry Pie Filling, and then maybe I'll try..... ;)

UPDATE 4-30-2012
I made this with (drained) Canned Peaches in place of the Bluberries and it was wonderful!!! So Good!!! Going to gain so much weight lol


Peach

Peach

Peach


UPDATED AGAIN 9-22-12
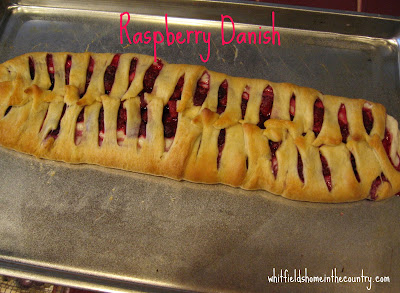
Raspberry Danish
I used frozen Raspberry's in place of the blueberries


 So good! Yum! 
I see a Cherry Danish in my very near future :) Stay tuned...

We will just have to roll us out the door pretty soon if we keep eating these!!

Update 9-30-12
Cherry Cheese Danish
Really, I think any fruit filling would be awesome in this! Cherry Pie filling didn't let me down! Even my hubby enjoyed it and he's not a fan of Cherry Pie...


Cherry

Cherry Cheese

Cherry Cheese
UPDATE 10-28-12
Apple Pie Filling,Cheese Danish
Think I will add a little extra Cinnamon on top of the apple filling :)
It was yum though! 


Apple Cheese

Apple Cheese

I have to say, these make good "thank you" gifts! They are quick, easy, and homemade! I've been making them a lot lately for friends and neighbors, for "thank you's" to show our gratitude.
Who doesn't like Homemade Desserts?  


Total Pageviews

Related Posts Plugin for WordPress, Blogger...