Blogger Widgets

Tuesday, November 13, 2012

DIY - Pretty Acorn Ornament


So if you follow my blog, some of you know that I have a ton of pine tree's, hence my  Pine Cone Decoration. Well, I have a bunch of Oak tree's also. I have several different species of Oaks. And these tree's put out a Gajillion acorns, and I mean a Bazillion!! So I thought, "What can I do with some of these??" ¯\(°_o)/¯   I know!  I'll make a ornament with the little "hats"!  ツ


Millions of em' !!

First I collected, what I thought would be enough (believe me, I didn't even put a dent in them!)...then I cleaned them, by letting them soak for a little while in hot soapy water (Dawn of coarse) Then I rinsed them and let them soak in hot water with some vinegar. Let them dry completely on a paper towel. BTW, I didn't collect enough, had to go out and collect more, several times... (¬_¬)


3" Styrofoam Balls
Craft Foam Ornament Hooks
Package say no glue needed, but I want mine permanent... so I glued it.

Craft Foam Ornament Hooks (back side)
Ribbon

Gold Glitter Glue
Clear Spray Paint
Acorn "Hats"

Here is what you need:

3" Styrofoam Balls
Hooks of some sort (I used Craft Foam Ornament Hooks - see picture above)
Brown Paint (spray paint would be best but I didn't have any, so I used my    craft paint)
Acorn "Hats"
Gold Glitter Glue
Clear Spray Paint
Ribbon
Hot Glue Gun (or any kind of craft glue. Hot glue dries fast)

I got the styrofoam balls, the hooks, the ribbon, clear spray paint and the glitter glue at Walmart, but you can find any of these at a craft store.

Dab some glue on the pointy end of the ornament hook and push it into the styrofoam, paint the styrofoam balls and the hook  brown. (I had to do two coats on the balls.) I used a wire to hold the foam while painting. Spray paint would probably be faster, but I didn't have any on hand. I just used my brown craft paint.


You can see the balls in the background have two coats of paint already.
Let them dry...
Once dry start attaching the Acorn "hats" with hot glue (I left the stems on the "lids", applied glue, and poked it into the styrofoam.


Put a dab of glue on the top of the "hat" and poke into foam.
Push "hats" into the foam.
Continue gluing until the whole ball is covered (if I had big gaps, I used the "not quite formed acorns" to fill in) I also used smaller "hats" to fill in.


Not quite formed acorns as gap fillers

Break them apart 
Once you have glue all the "hats" on, Spray with clear coat (I did two coats of clear because I used Satin finish.) Let Dry....

Using the glitter glue I squeezed some glue around the top of a few hats, then with a paintbrush, painted it all around the edges. Continue squeezing glitter glue and painting on all the "hats" until complete. I swiped the insides of the "hats" with a almost dry brush with just a little glitter glue on it, to just give it a hint of glitter.
Let it dry...You may need to go back and apply to spots that you missed, or to just give it a second coat of glitter, up to you.

Once its dry, tie a 8 inch (approximate) piece of ribbon on the hook for the hanging ribbon, and knot it. With a 12-15 inch (approx.) of ribbon, make a bow and glue it to the ornament, close to the hook, making sure not to glue the hanging ribbon, so it can move freely.


Sorry about the focus on this one, but you can see the glitter pretty good in this shot!

Added new picture 12-25-12 of the ornament on my tree


That was fun!


Saturday, November 3, 2012

No Sew Blanket Tutorial


thought these were so cute!!! So I made one for our grand baby for her birthday in September!  I got the idea to do one of these from Judy over at Pieces of Me
I had seen them before but I never paid attention to how simple and fun they are to make, and it isn't a long drawn out process. They are fairly quick and easy.  I love those kinds of projects! And I love seeing quick results, and something so cute!!


Here is what you need:

Fleece  two different patterns, one printed, one solid which compliments the printed one, or two patterned ones, totally up to you.
Straight Pins
Ruler
Scissors


Lay out your fleece so it's smooth.(hopefully you have someplace big enough to spread it out, I used my dining room table) Place one piece on top the other so the edges are lined up. Making sure that the "right side" is facing out on each piece. Line them up as best as you can. You might have to trim a little off if its to crooked. Having a little extra on one side is okay. I just try to make it even all the way around.

I didn't/don't cut of the lettering on the side, you can if you want to, its totally up to you :) its just an extra step and it looks fine when its done. 

Once its all smooth and where you want it, measure and pin 4 inches all the way around.

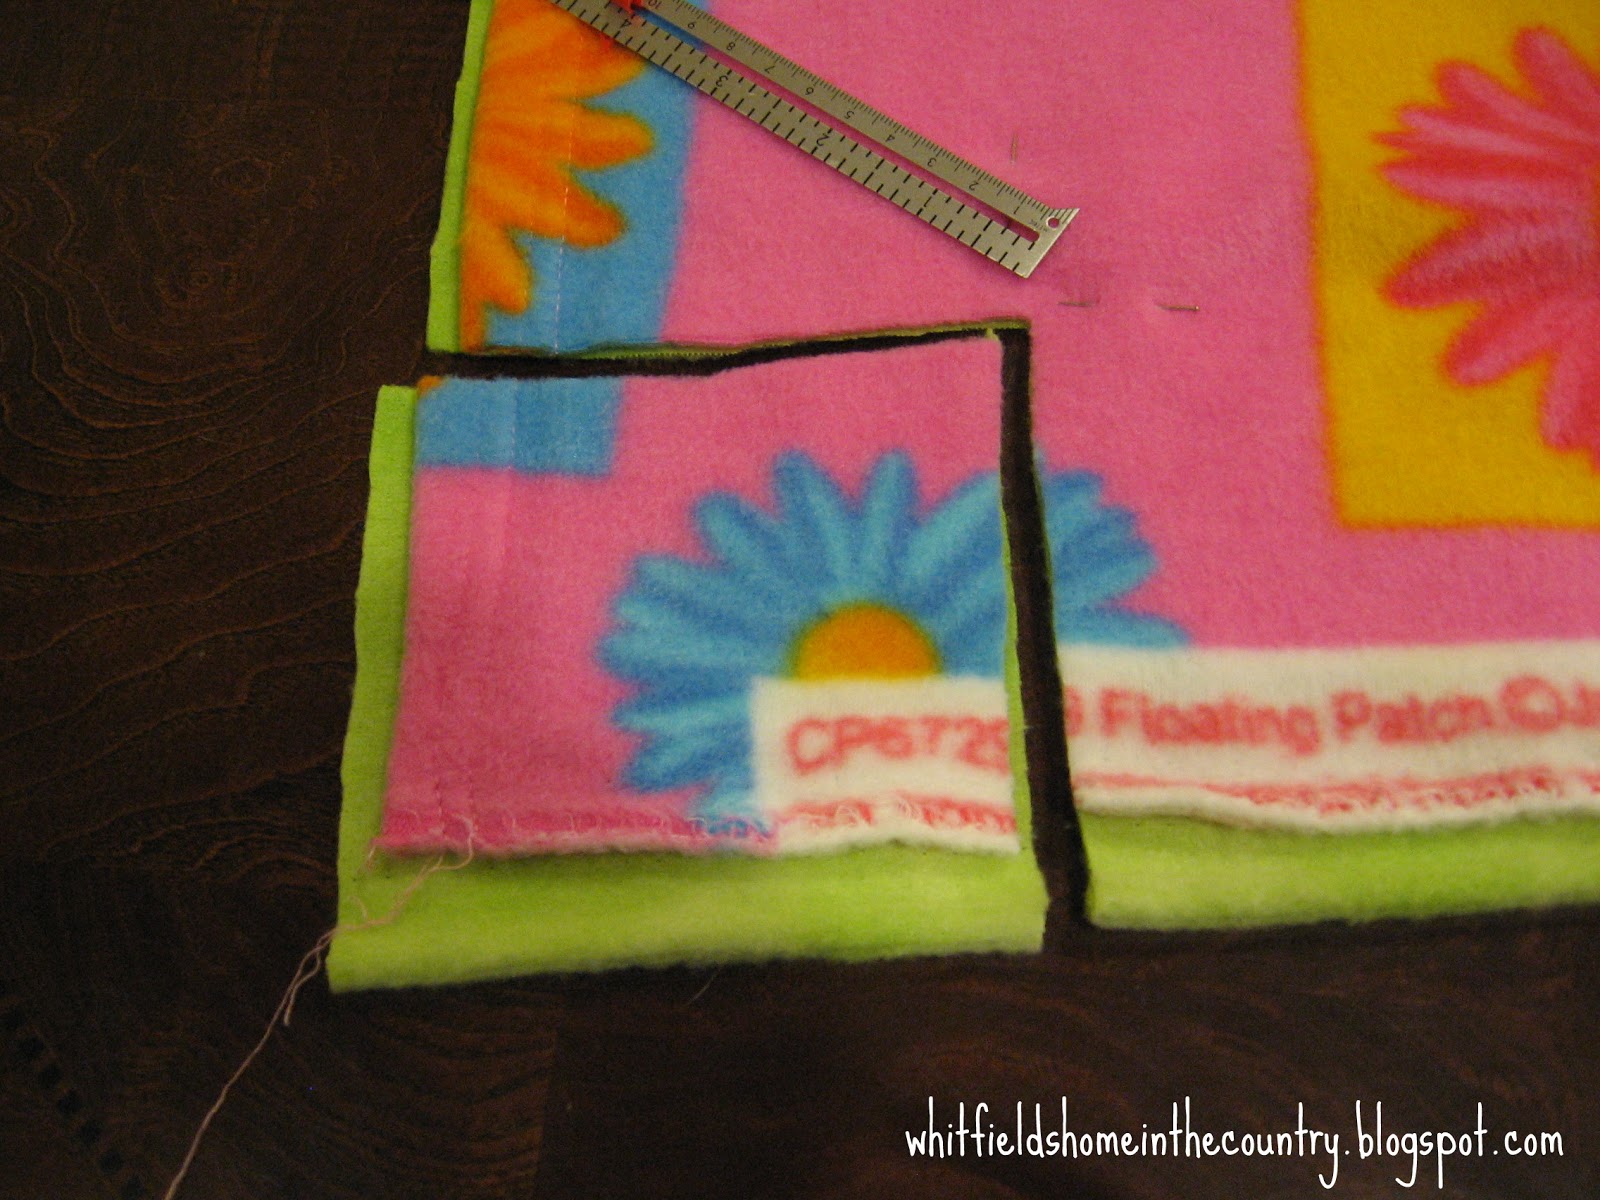
On one corner cut out a 4 inch square, continue to the next corner and do the same, until you have done all 4 corners.


Using the pins as your cutting guide, cut 1 inch wide strips that are 4 inches long. You can mark your fabric every inch or use a yard stick to see where to cut every inch. I'm good at "eyeballing" it, I might have a few that are wider or skinnier but that's okay too! I cut about 20 strips then tie them in double knots, that way my hands don't get tired as fast.(I have carpal tunnel from cutting hair!) It works for me. Some people might cut the strips all the way around first, or some people might just do one side at a time.


See my pins? I use them as my guide

I tie a few on the connecting corner as well, just to make sure it stays straight, and the corner is square. 


Square Corner


Work your way making double knots all the way around until you are finished. Its really pretty quick.


Almost done! :)

I really don't like that it isn't attached in some way in the middle, so I sew one stitch (think quilt) right in the very center. I used a contrasting color that matched the front.


Can you see the pink string in the center?

Notes:
*I used 1 yard of each color for this blanket. It was 60 inches wide so it made a pretty big blanket for her, she's only 2.

*For an adult you would probably want to use at least 2  to 2 1/2 yards of each color, depending on the width of your fabric. But you can make it as large, or small as you want. That is the beauty of it, there is no set size.

*Make sure the two fabrics you pick are the same width.

*There are several different ways to tie them, double knots (the way I did them),  balloon knots or braided.
Balloon -(picture from instructables.com)
Braided- (picture from helpinglittlehands.blogspot.com)

And something else I learned...the nice soft silky fleece doesn't work! It rips and falls apart when you try to tie the knots.  (-’_'-)  Live and learn...


Bella loves her blankie, that her Mimi made for her!  ♥  ツ  


Just have fun 

♥║║
╚══╝


Saturday, October 27, 2012

Homemade Hot Chocolate


Its about that time of year again to break out the Hot Chocolate. (except in my house its a year round thing!) I think my husband is a connoisseur of hot chocolate, its his "coffee" in the morning.... with LOTS of marshmallows!!!!  Mmmm Ooey Gooey melted Marshmallows in some Hot Chocolate!   He loves Swiss Miss Hot Chocolate, and nothing else will do. ¯\(°_o)/¯  I buy the 30 pack from Walmart because I have to use two packets at a time (he's so darn picky lol) and if I change something up (¬_¬)  believe me he knows!!! (ಠ_ಠ) Just ask the kids ... hehehe

I thought I'd try to make some homemade Hot Chocolate and told him I was thinking about it, and he said "Just make a small batch to see if I like it." I showed him all of the ingredients and he said "Oh, go a head and make a whole batch, that kinda looks good" LOL!! I need to make those homemade marshmallows to, but he goes through them so fast! Probably not worth it. Plus there is a certain brand he likes too (told you he's picky) at least it's a store brand. The way he goes through hot chocolate, this might be a treat a few times a year.

This is very rich!! And if you like milk chocolate, then you might not like this, as its more of a dark chocolate flavor. I think next time I will look for a different cocoa.... 


This recipe makes about 20 servings

Here is what you need

3 Cups Non Fat Dry Milk
2 Cups Powdered Sugar (I'm sure you could use regular sugar also)
1 1/2 Cup Unsweetened Cocoa Powder
1 1/2 Cup White Chocolate Chips
1/4 Cup Salt


In a large bowl make a mess stir ingredients, to combine. 


Stir....

Pour half of the mixture into the bowl of a food processor and process until the white chocolate is finely ground. 


Transfer mix to an airtight container, then repeat with the remaining. (I have a mini processor so I had to split it up more) Store in the airtight container for up to 3 months.

To make the hot chocolate, mix 1/3 cup of the cocoa mix with 1 cup hot milk, or water, which ever you prefer. I tried half milk, half water and it wasn't very good. I think all milk was the best!


Try to stay warm....


Saturday, October 20, 2012

Single Serving Chocolate Chip Cookie in a Mug


Do you ever get a sweet tooth late in the evening and there NEVER seems to be anything that  satisfy's it?  Or its way to late to go out?!  Well I have something....I had a request awhile ago in My Survey to do a Mug Cake, and I was looking around for a good recipe and found this recipe from Melissa at no.2 pencil... I know its not a cake, but...
I will still do a mug cake but I had to do this first :) this is a single serving cookie made in a custard cup. (or  a coffee mug, or a ramekin) Its fresh and it can be made in a matter of minutes! Don't ya just love that!!??
I saw a bunch of recipes floating around on Pinterest but I wanted to give something different a  try.... and this was it!

This has the potential to be really bad... because its THAT good!  I'd better not keep all the ingredients in the house, or they will have to roll me out the door come spring time  (-’_'-)

Mine took all of 60 seconds to cook, the bottom layer reminded me of  Subway's Chocolate Chip Cookies....yum!
Set your microwave for 40 seconds and go from there, I checked every 10 seconds after that.


This is what you need


1 Tablespoon Butter
1 Tablespoon Granulated White Sugar
1 Tablespoon of firmly packed Dark Brown Sugar
3 Drops of Vanilla Extract (this is really hard! be careful)
Small Pinch of Kosher Salt (or regular table salt)
1 Egg Yolk (I gave my egg white to the dogs, they ♥ me)  ツ  
Just under 1/4 Cup of All Purpose Flour
1/8 Cup Tablespoons of Semi Sweet Chocolate Chips (I used mini's)


Melt tablespoon of butter in microwave (not shown)
Stir in  Sugar, Brown Sugar, Vanilla,and Salt.
Stir... Add Egg yolk, stir


Add  Flour


 and Stir some more... 


Add the Chocolate Chips...


Stir...

Transfer it to the cup your cooking it in. (I wasn't sure it would fit in the custard cup or I would have mixed it in there.)
Put it in your microwave for 40 seconds and check for doneness every 10 seconds after that.


60 Seconds, Ding..all done! Let it cool a minute if you can  ¯\(°_o)/¯


A picture is worth a thousand words...had to put the dreamy softness effect around it hehehe 


MMMMmmmm warm and gooey


Nom, nom, nom


What are you waiting for?  Only takes a few min....


Total Pageviews

Related Posts Plugin for WordPress, Blogger...