Blogger Widgets

Pages

Wednesday, November 13, 2013

Garden Totem


I know its late in the season for this post, but I never made the time had the time to go thrift shopping or the money when I had the time  ツ I have wanted to make one ever since I saw the different ones posted on Pinterest from different websites. And I LOVE Cobalt Blue anything. I also want to make a garden totem that looks like a mushroom.
Garden Totems have an easy shopping list, maybe you have some pieces that you can use in your own cupboard? Or  maybe you purchased some glassware at a garage sale that you don't really know what to do with but you couldn't be without! OR You can buy the glassware this winter and in would be a work in progress project! ;)

My husband "glue" these together for me, you see I am short, and we put them together on the dining room table, so the first 3 pieces were already taller than me lol. Besides that he's way better at getting a smooth caulk bead. I wanted to make sure its good and sealed! I did however tell him how I wanted them put together, there are quite a few ways we could have put these together! He added his own touch to it by adding a piece of black granite tile (thank you Miss Pat) to the bottom to make it nice a sturdy. I don't want it to tip over and break!


Here is what you need:

Miscellaneous Glassware of your choice
GE Silicone II (make sure its silicone II because its heat and freeze proof and its also waterproof.Its flexible too!) I got mine at Lowe's, but just about any hardware store should carry it.


I made one of my Paper Peony's to put inside the crackled globe bowl (above)
I wanted to find a hummingbird or something cute like that, but couldn't find what I wanted...next time maybe..


Cobalt Tea-lite holder on a candle stick holder 

We "glued" (silicone) two pieces together at a time. Then once those were dry (we waited about a day in between) we "glued" those two to two other pieces and so on and so forth till they were all glued together. I didn't want any pieces sliding!
\


Finished Totem


I see more of these in my future!!  ツ 


Be creative see what you come up with ....


Sunday, October 20, 2013

Homemade Jewelry Cleaner


Have you ever needed to clean your jewelry and didn't have any cleaner? 
My Grandma used to make her own, and told me the recipe a long time ago.
If your in a pinch and need some quick, this is good because most people have these things on hand. This is all I've ever used and it works perfectly! I wear silver and white gold jewelry, & my husbands ring is titanium  and its never harmed anything I own. Quite the opposite, its made it all very shiny!!

Also I use toothpaste to clean my silver jewelry that is a little tarnished.The paste kind works best, instead of the gel.. I just use a old tooth brush on it and rinse well when I'm done then put it in the homemade cleaner, shiny! {see below}


What you Need

Ammonia
Dish Soap ( I used Dawn, but you can use any)
Water


You can make as much or as little as you need, just use equal parts of all 3 ingredients. I used about 1 Tablespoon of each for this batch, if you put it in a lil container that has a lid, it will lasts forever!! {or at least until it gets too dirty and needs to be changed out} ツ 


 I use a tooth brush on my rings, to get in all the crevices.

All clean! {Its hard to take a picture with one hand ans zoom in AND keep still!}

Necklace that has some tarnish.. 
You can fix that with a little dab of ToothPaste!


I usually work it between my fingers first, then use a damp toothbrush, but I was trying to keep my camera hand toothpaste free!  


After the toothpaste rub down/scrub, rinse all the toothpaste off and soak in the jewelry cleaner for about 10 minutes, rinse well and dry.

All clean && Shiny!!


Also if you have a jewelry box, and you have lots of sterling silver jewelry, take a piece of foil {doesn't have to be big} and ball it up a little and keep it in your jewelry box, that will help the silver from getting tarnished so fast! Or you can take a piece of foil and place you silver in it and fold it up in there.
Now you have some Homemade Jewelry Cleaner that actually works!
Your welcome...  


Now go get your jewelry that needs to be cleaned and make some cleaner!


Monday, October 14, 2013

Lingerie Chest Makeover


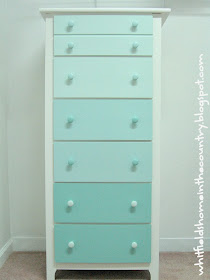
I have been wanting to re-finish my daughters old lingerie chest for awhile now. It was showing its wear and tear, and the bright white that it used to be, was a ugly yellow-ish color,  no matter how much you tried to scrub, it always looked dirty.
I'm slowly getting my craft room (some future posts ahead!) put together and this chest is part of my storage. I have been wanting to try the homemade
chalk paint, but I think I'm saving that for an old hope chest that needs some serious TLC, but cant have to much sanding done to it! 
This dresser has a smooth laminate top and seemed to be dipped in a thin textured laminate coating,(drawers included) and some of it was chipping off. It looked terrible to me. I also have a dresser and a night stand that matches (and they are both in the same sad shape) but that is for another time, and another color   ....


Things you need

Sander- Palm Sander or a Block Sander
Sand Paper (I used 220)
Primer (I didn't use, but its up to you)

Paintbrush, Foam Roller- I used a 1"inch paint brush to "cut in" under the top (where the roller can't reach)
Paint - your choice of colors
Rags - (2) 1 damp rag t-shirt to wipe down after sanding, and a micro fiber to wipe it down after the damp one.
Furniture Paste Wax - optional


I did sand this with the palm sander, just enough to take the shine off the laminate, it wasn't to bad since its textured. I did leave the top alone, as it wasn't textured and it was still in good shape, but lightly sanded everything else. (Sorry no pictures of the process...just before and after)
One of the back legs laminate and a few layers ripped off from me moving it by myself over the yrs. but my hubby glued it back on and used Spackle on the seam. (picture below) Its good as new...well almost   you can't even see it now, that's all that matters!

I gave everything 3 coats of paint using the sponge roller, and let it dry really well in between coats. I did 1 coat a day, 3 days in a row. I didn't use a primer on this piece, I didn't feel like I needed too. I will report back on how it holds up.  I decided to leave the sides and front a Bright White, and to put some color on the drawers like a paint chip card. I kept the old knobs and painted them the same colors as the drawers but interchanged them. I let it all dry for the full curing time (on label) before I assembled it back together. I think I will use some clear furniture wax on it, (either Minwax, or the Johnson Paste Wax) it will help protect the finish!


BEFORE:


AFTER:


I'm happy how it turned out! && It LOOKS so much better now!    ツ


Thursday, September 19, 2013

No-Bake Chocolate Oatmeal Cookies


This is a quick post on No Bake cookies, a classic, something my hubby has been wanting me to make for a while. He remembers his grandma making these when he was young, and I remember my sister used to make these as a teenager.
These would make a nice snack and a great surprise for when the kids come home from school.
These don't take long to make and you have to work fairly fast, so I didn't get any "during" photos (sorry) I was however, practicing with the macro setting on the camera, both my camera and my husbands camera. So I have lots of "after" photos    I was wondering,why is it called macro? Instead of micro? My cousin calls it "the flower setting"     I've been taking pictures of bugs that are invading my house (outside) and they just don't focus that well when your zoomed in and you cant hold still 
(•̪●) so my cousin (you know who you are) says "did you have it on the flower setting?" ;•)  I did, but I needed a tripod, apparently. Because I couldn't hold still and they all turned out a little fuzzy. So I practice with my husbands camera.(He has a good one!)

Anyways on with the recipe...


Here is what you need:


1/2 Cup Butter or Margarine
2 Cups Sugar
1/2 Cup Milk
4 Tablespoons Cocoa
1/2 Cup Creamy Peanut Butter 
2 Teaspoons Vanilla
3 -3 1/2 Cups dry Quick-Cook Oats (I used 3 1/2 )
Wax Paper

Add the first four ingredients into a medium size sauce pan (around 4-quart ) 
Bring to a *rolling boil and boil for 1 minute. I use my timer.
Remove from heat.
Add peanut butter into the hot mixture and stir until melted.
Add vanilla. 
Mix in the oatmeal and drop by tablespoons onto wax paper.
Let cool until set. 


*Rolling boil  - boiling vigorously, when stirred it doesn't stir down.
Picture of a rolling boil.
Photo credit motherwouldknow.com


I put my wax paper on cookie sheets, that way I can let them cool in a cold oven (I have this paranoia of flies landing on them) and also I can speed up the cooling off by putting them in the refrigerator for a few minutes.


This recipe makes about 24 cookies, depending on how big you make the spoon full. You can double or triple this recipe ...


Very shiny when they aren't "set" 


Yum!
Choo Choo... next stop, my thighs!!    


These take about a half hour total to make, maybe less and they are oh-so-good!

Enjoy!!


Friday, August 30, 2013

Sea Glass Paint - Tutorial


I love sea glass! But real sea glass takes years to get that way. The most common colors of sea glass are kelly green, brown, and white (clear). Sea glass begins as normal shards of broken glass that are tumbled and ground until the sharp edges are smoothed and rounded. The glass loses its slick surface but gains a frosted appearance. There are several methods of making sea glass. The first type is the natural process. Second is  produced artificially, when pieces of glass are tossed into a rock tumbler or dipped in acid.
Third is glass paint :) That's what I'm doing...


You just need some clean glass bottles, jars etc.


Here is what you need:

Glass Bottle, Jar, Vase etc.
Rubbing Alcohol
Martha Stewart Glass Paint (Frost) in the color you choose. I found it at Michaels
Paint Sponge
Martha Stewart Foam Pouncers  you can get these at the craft stores also. 

I had some cute little jars my husband saved that Patrón came in (the lil bottles with the corks) I also save the jar(s) that candles came in from Dollar General and the tall bottle is a bottle that vanilla came in. I'm looking around for other glass too....


First get any labels off and use something to get the glue off, I used Goo Gone. Wash glass with soap and water to get the cleaner off as its a little oily feeling. 

Next, clean your glass with alcohol, making sure there isn't any residue from labels or stickers. Wipe with clean t-shirt to make sure there isn't any fuzzies.


Next I squirted a little paint on the bottle and "pounced" it with the sponge. If you have ever done stenciling you know how to do this, if you haven't done stenciling, you just kind of "dab it." 
You have to work somewhat fast as this paint dries fairly quick! 
This paint goes a long way, a little dab'll do ya :)  I like that! I can paint more!


Paint and pounce all that surfaces that you want "frosted" Let dry in between coats. Its probably dry in about 15 min., but I gave it about an hour between coats. I did 2-3 coats on each piece. If you make a mistake, you can scrape it off with a razor, just be careful!
That's it!  Easy Huh!? 
I then wrapped some hemp twine around the neck and added a few misc. beads. On the vanilla bottle I glued the hemp on the neck to hide where the threads were.

Instructions for curing are down below...


You can let it cure for 21 days (it will be permanent) or
cure it in the oven (also permanent) that's what I did...

Oven Curing
To cure in the oven:

I used a cake pan and put a sheet of parchment paper in it.
You put your painted glass on the cake pan or cookie sheet Let project air dry 1 hour, place in cool oven. Set temperature to 350 degrees. Once oven reaches 350 degrees, bake for 30 minutes (**glass must heat gradually). After 30 minutes, turn oven off. Let glass cool completely in oven. Wait 72 hours before using.

** This is important, Warning ~ you don't want to put cold glass in a hot oven or it will break from heating to fast you want cold glass in a cold oven to start! 

I was still scared that my glass would break, but it was fine. But not all glass might be suitable, you just have to take that chance, and hopefully not have a mess to clean up!


Patrón Bottles


Where is some more glass to paint.... 


Any questions? Ask in the comments or send me a email whitfieldshomeinthecountry(at)gmail(dot)com