Blogger Widgets

Tuesday, December 25, 2012

Merry Christmas 2012


Thank you for taking the time to read my blog and for all your comments.
Thank You for Sharing my world....

Merry Christmas
Be safe in your travels!


Friday, December 21, 2012

Buckeyes (Candy)


Once upon a time, I made these for Christmas a long, long time ago. I don't know why I haven't made them since, they are so good, and they aren't that difficult to make! I've talked about them though, so much so, that I piqued my husbands curiosity, he said "You talk about them all the time, and now you've made me want them. :D Make them already!" So I did, and he loves them. 

They are rich and peanut-buttery. So if your on a diet or a diabetic you might want to steer clear of these, and go look at one of my other pages! ;)


I don't remember, when I made them before, if my arm was about to fall off, from stirring, but I must have used my mixer or something. I don't have one now :( (it died two years ago) so my arms felt like they were about to fall off from stirring!! And it seemed like it took for-everrr... I really need to get a stand mixer, it would have gone a whole lot faster!! Instead of what seemed like hours of stirring would have been minutes! lol  ¯\(°_o)/¯

I've seen several different recipes, but I am going with the one I'm familiar with. I've seen people add Rice Crispy's and Crunchy Peanut Butter, but true Ohio Buckeye Candy isn't made with any of those things, nope. I've also heard them being called Peanut Butter Balls...to me, they are Buckeyes, you can call em' anything you want. I guess you could say I'm particular about the name because I'm from Ohio, and Ohio has the Buckeye trees....


What you need:

2 lbs. Creamy Peanut Butter
1 lb. Butter
1/2 tsp. Vanilla
3 lbs. Powdered Sugar
Two 12 oz. bags of Semi Sweet Chocolate Chips Don't skimp on the chocolate.
1/2 of one Paraffin Bar ( you can find this in the canning isle)
Wax Paper 
Tooth Picks
Cookie Sheets

Cream Peanut Butter and Butter  and Vanilla until combined. 


Add Powdered Sugar with a sifter, a little at a time.


Make a mess on the counter...


Stir...


Keep adding more Powdered Sugar, and stir some more, till you feel like your arms are  about to fall off lol Unless your lucky and have a mixer!


 (I seriously was thinking about my husbands paint mixer/cordless drill at this point in time Haha) I didn't though! Ugh!


My arm was about to fall off at this point!
Once you have all the powdered sugar in, make sure its thoroughly mixed
It'll be about the consistency of cookie dough.


if you have a small cookie scoop, use that but otherwise use a little less than a spoonful of "dough" and roll into about 1 inch balls. Roll all the balls and put them in the freezer for about a half hour or so. 


In the mean time...

In a double broiler melt your Chocolate Chips and Paraffin.
If you don't have a double broiler (Like me) then use a bigger pan and a smaller pan, fill the bigger pan with just enough water for the smaller pan to be submerged just a little. The whole object is, to melt the chocolate and not burn it. 
(I just realized I didn't take pictures of that step.. opps!) Some recipes I have seen melt the chocolate in the microwave, I prefer the double broiler method, that way I don't have to keep re-heating it in the microwave.
Line  cookie sheets with wax paper. 
Once your chocolate/paraffin is melted put a toothpick in the balls and start dipping your dough balls into the chocolate almost covering the whole thing. 
FYI..  If your balls aren't chilled they just slip right off the tooth picks into the chocolate. :(
Place on wax paper to cool and harden. Smooth over the tooth pick hole with your finger.


Paraffin is used to make the chocolate set better and to make them shiny when they are cool.


These need to be stored in a cool place, so store them in the refrigerator, or if you prefer, in the freezer. That's where mine are, in the freezer.

This recipe was suppose to make about 400 balls, I guess mine were bigger(two bites instead of one) because it only made about 160.


You can half or quarter this recipe.

Enjoy.... and try not to eat them all ! 


♥║║
╚══╝


Friday, December 14, 2012

Glittered Pine Cone Ornament


As I said in my last post, I had a couple  ornaments to share, and here is the other one....
This one, follow the instructions of my other Pine Cone Ornament until you get to the step where you paint the tips of the pine cone with  color.
With this one though, using a  medium size paint brush brush on some glue, everywhere. Everywhere that you want glitter that is   
 I did mine all over, the more the better! This project is super easy and great to do with the kids!! Kids love glitter (and so do I)
Somebody needs to come up with a non static glitter! Every time I work with glitter, its all over the place! I even tried using some furniture polish wiped on the inside of a plastic bowl and it STILL stuck to it. I tried cookie sheets, wax paper, all to no avail. Sticks to my hands no matter what. I am ordinarily a static-y person, I apparently carry so much static in my body you better not touch me till I touch something else! LOL Especially if I have been in my car! I dunno why?? ¯\(°_o)/¯

Anybody have any tricks to use so glitter doesn't have so much static? Please share!!


Here is what you need:

Pine Cones
White Paint 

Glitter
Glue
Paint Brush
Small Screw Eye Hooks

Thin Ribbon (for the hanging string) **
Medium Ribbon (for the bow) **I just used the same ribbon that I used for my other Pine Cone Ornaments


First I screwed all the eye hooks in the bottoms then I sprayed them all white, I gave them two coats each.
This time, my husband set up a spray booth for me and I used his air compressor and spray gun.   
You can use spray paint though.I painted some of my XL large pine cones that I got from a friends yard, and 1 teeny tiny pine cone (see it hanging in the pic? Isn't it cute!?) and a few large  cones and a few medium ones. The largest one I have measures 8 1/4 inches tall !!!


Hanging Pine Cones...waiting to be decorated :)
Here are a couple pictures of my XL Pine Cone, and one along side of a Medium size


8 1/4 inch Pine Cone
Next step, "paint" glue on the tops and bottom sides of the pine cone. (All over) I can "paint" most of my pine cone except where I'm holding it. (usually about a 1 inch band around the bottom)


Next comes the glitter    sprinkle as much as you like, or as much as the glue will hold, you will find the spots that you didn't apply the glue, you can either  apply more now or when you go back and apply the glue and glitter where your fingers were holding the pine cone. You will get glitter in your glue and on your paint brush if you do it while its still wet, but I didn't mind, so I filled in while wet.


Put as much or as little as you like. I like a lot!


Once its dried and you have as much glitter as you want on there add your hanging ribbon and your bow....


Isn't that pretty!!??


 I can't wait to get the lights on our tree (tonight) to see what it looks like all sparkly and shiny! I'll take more pictures and add them.

Finally added the lighted tree pictures 12-25-12


Here ya go Di  :)

Glitter on....


Saturday, December 8, 2012

Hot Glue Snowflake Ornament


Since its so close to Christmas, I thought I'd do a couple more ornaments, I thought these were so cute and I wanted a few for my tree! I got the idea for these, from here. They were fun, simple and fairly quick to make. This might be a fun project to do with the older kids as the glue is hot and they tend to have a little more patients than younger kids.... I think just about everybody has a hot glue gun, so you could make some too! And if you don't have one they aren't that expensive to buy. 
The trick with these, I think, is you have to take your time, go slow and try to make it as smooth as possible. My first one didn't go so great, :( kinda turned out crappy alright, all thanks goes to the glitter that hid all the defects!  I think if the inner circle was a little smaller, I would have liked it more...I'll hang it on my tree anyway, but I like my second one the better.
Don't get confused if you see two different snowflake patterns, I took pictures of both for the tutorial. I wish I was a better photographer, but sadly I'm not    My picture taking doesn't do them justice! But on the other hand, it doesn't show all the flaws as well either! hehehe 
I did get my hubby to take a few with his camera, he's way better at taking pictures than I am, he took the ones of the snowflake up against the fern for me.

Anyways...


Here is what you need:

Hot Glue Gun
Glue Sticks
Any Dish Soap
Wax Paper
Snowflake Template (I made my own because my printer is out of ink because I am so good like that  ツ  )
Mod Podge or Glue (I used glue, because I didn't have mod podge)
Glitter - any color you chose (I used Iridescent)

String or thin Wire


My first template (that I added to it as I went, as you'll see)
I didn't use a cookie sheet to work on (or something similar) I just did it on the table, I regretted that because I needed to turn the paper as I worked and I couldn't turn the table lol... so find something flat to put it on that you can turn.

That being said, Plug in your glue gun and while your waiting for that to heat up, rip a sheet of wax paper off the roll and put your template beneath it (you might want to tape the corners as it does move around a little) First squirt a little soap on the wax paper, you don't need a lot, you can even add a tiny bit of water to thin it out a little, just make sure a thin coat covers your design. 


Squirt some soap on wax paper and spread over design
Once your glue is hot begin by tracing your template working slow, don't make the glue lines to thin or it will be to flimsy also try to make it as smooth as possible.


My second template..I like this one much better!
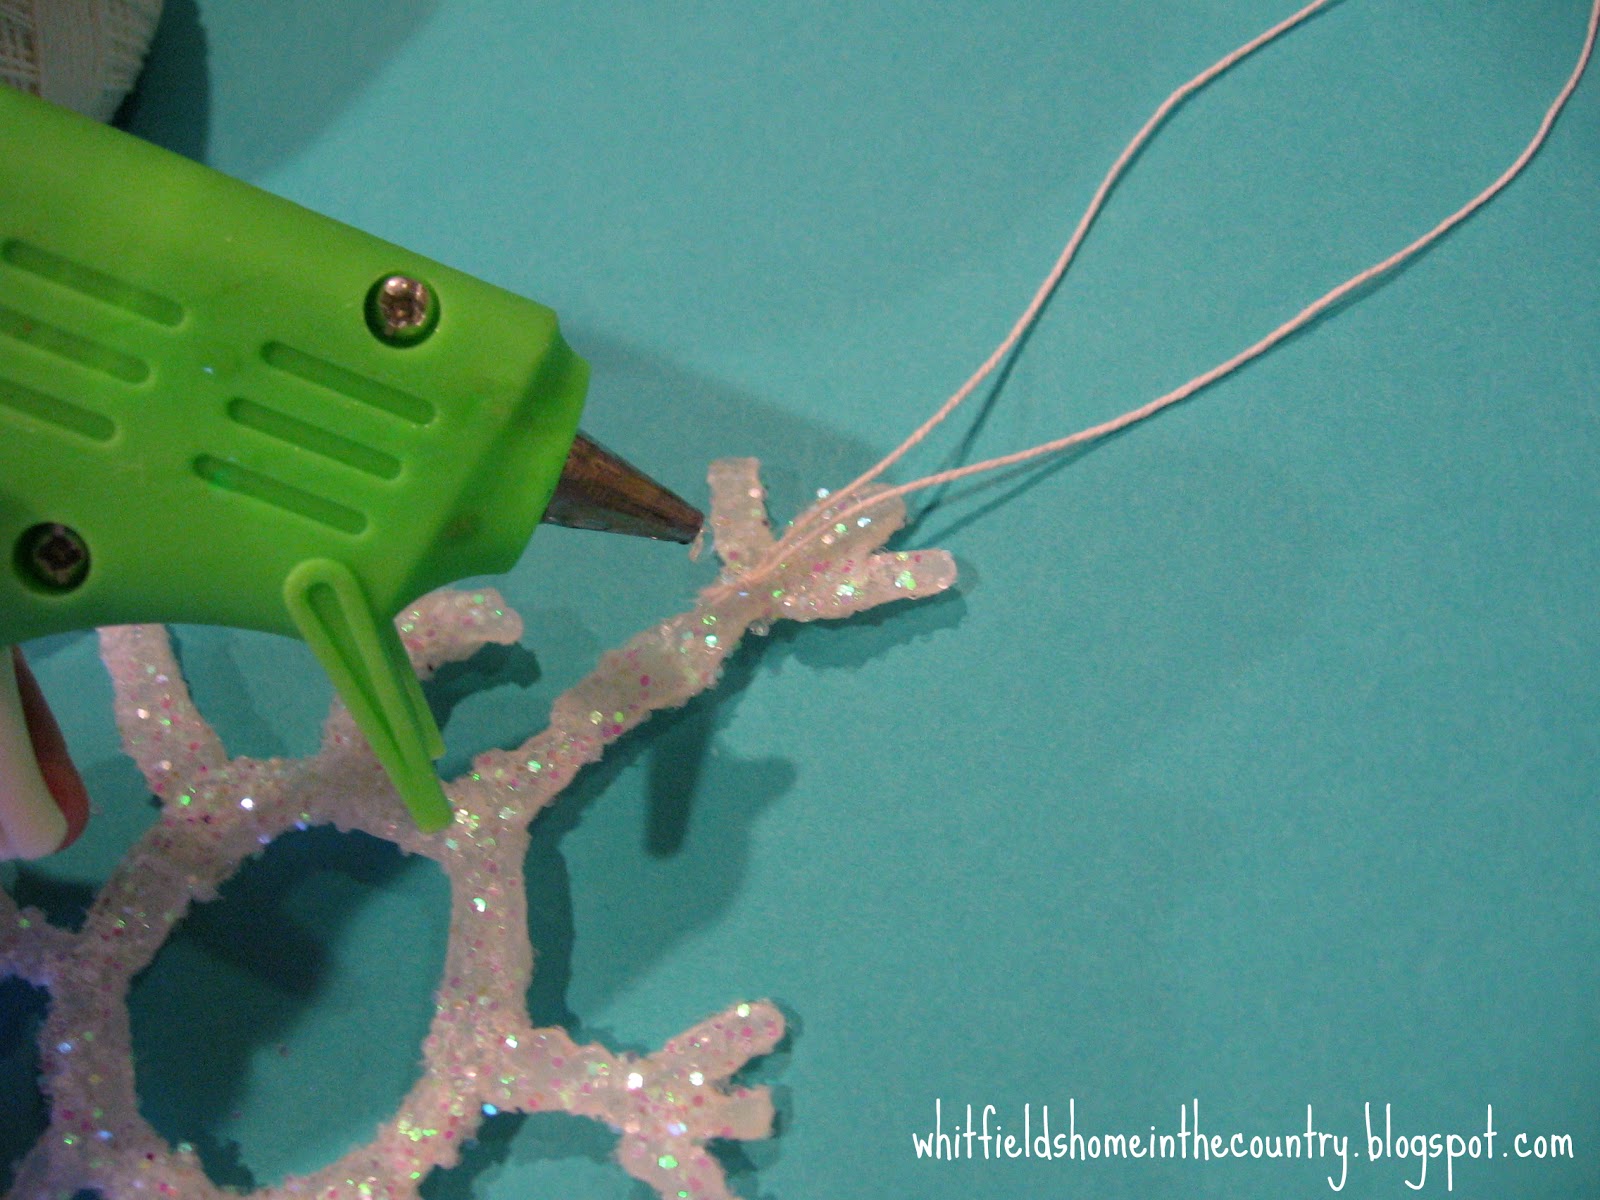
Trace template with glue

Once you have finished tracing your design, let the glue cool and get hard.
When the glue is hard, carefully peel the snowflake off of the wax paper. Run it under cold water, this helps harden the glue further and to rinse the soap off. 
Dry the snowflake and place on a plastic (disposable) plate and with a paint brush "paint" on your mod podge (or glue, in my case) I watered down my glue a little, to thin it out.


Work on a plastic plate 
Cover the snowflake with glitter....


I let mine dry and glittered the other side as well. :)

Once it was completely dry, on the back side, I glued the string on.


That's it! Just wait for it to dry... Hang it on your tree

My husband made a suggestion of incorporating the string right into the design, that way there is less chance of the string coming off later. That was a good suggestion, I thought...to late for me to use this time, but not for you! 


My second snowflake
This ones Blinging ;)


I don't have pictures of it on my tree because we haven't put it up yet, maybe this weekend...
I'll take some of the ornaments on the tree and post them later.


Can I make a request? Somebody needs to make glitter that isn't static-y!  If you work with glitter its gonna be all over you and your house lol ..That's okay everything is all sparkly (even my husbands backpack he took to work today..shhhh!) ¯\(°_o)/¯ Hehehe.....

Tips:
If you store your glue sticks in the freezer you wont get those little strings when you pull away. 
If you don't store them in the freezer you can add a little Vaseline to the tip and that should do the trick to not get strings.
If you don't do either of these then a hot blow dryer will get rid of the stray strings.

I hate the strings! It always feels like spiderwebs to me, and I hate spiders!!


Make your own snowflake template, (just make sure all the lines connect each other) and let me know how yours turned out.

Edit 12-13-12
I had a good idea for these, not only do they make nice ornaments for the tree, but they also would be really cute hanging with a suction cup in the window!! I would probably use some really thin fishing line for the string for the window ornaments.


Added new picture 12-25-12 with the lights on my tree..


Be Creative, && Have fun!


Total Pageviews

Related Posts Plugin for WordPress, Blogger...